Wednesday, March 4, 2015

Estate Sale Dresser


I found a dresser that had such pretty details. It was covered in thick gross apple green paint, but under the paint I knew it was pretty. I have painted a few old beat up pieces of furniture, but this was the first piece that was already painted. I initially thought it would be nbd to simply paint over it w my homemade chalk paint, but after inspecting it further I  felt like some of the paint and dried drips needed to go.

This photo does not do it justice. This was some serious apple green thick paint. The pretty details were hidden. I started by sanding lightly with my orbital sander followed by using stripper on the top. I sanded and sanded until the top was stripped down to bare wood and the body of the dresser was free of drips. There was a dark green paint under the apple green paint. I also sanded the tops of the drawer faces because there was so much paint the drawers didn't close easily.


I decided to paint the dresser a light blue/grey and stain the top a dark color. The top stripped down beautifully. 


I was so happy to finally paint. I spent more time on prep for this job than I expected. I will think twice before taking on another heavily painted piece again! Once I had sanded down the old drips, I wiped it down with a tack cloth and painted with 2 coats of homemade chalk paint with a light sanding in between. I distressed it lightly and waxed it with Fiddes and Sons clear wax. I was not seeing the beautiful details as much as I wanted to so I tinted some clear wax with the dark stain. I waxed with the dark wax to make the details pop.


I love the hardware. I wiped them with a clean cloth before replacing them. They were in very good condition.


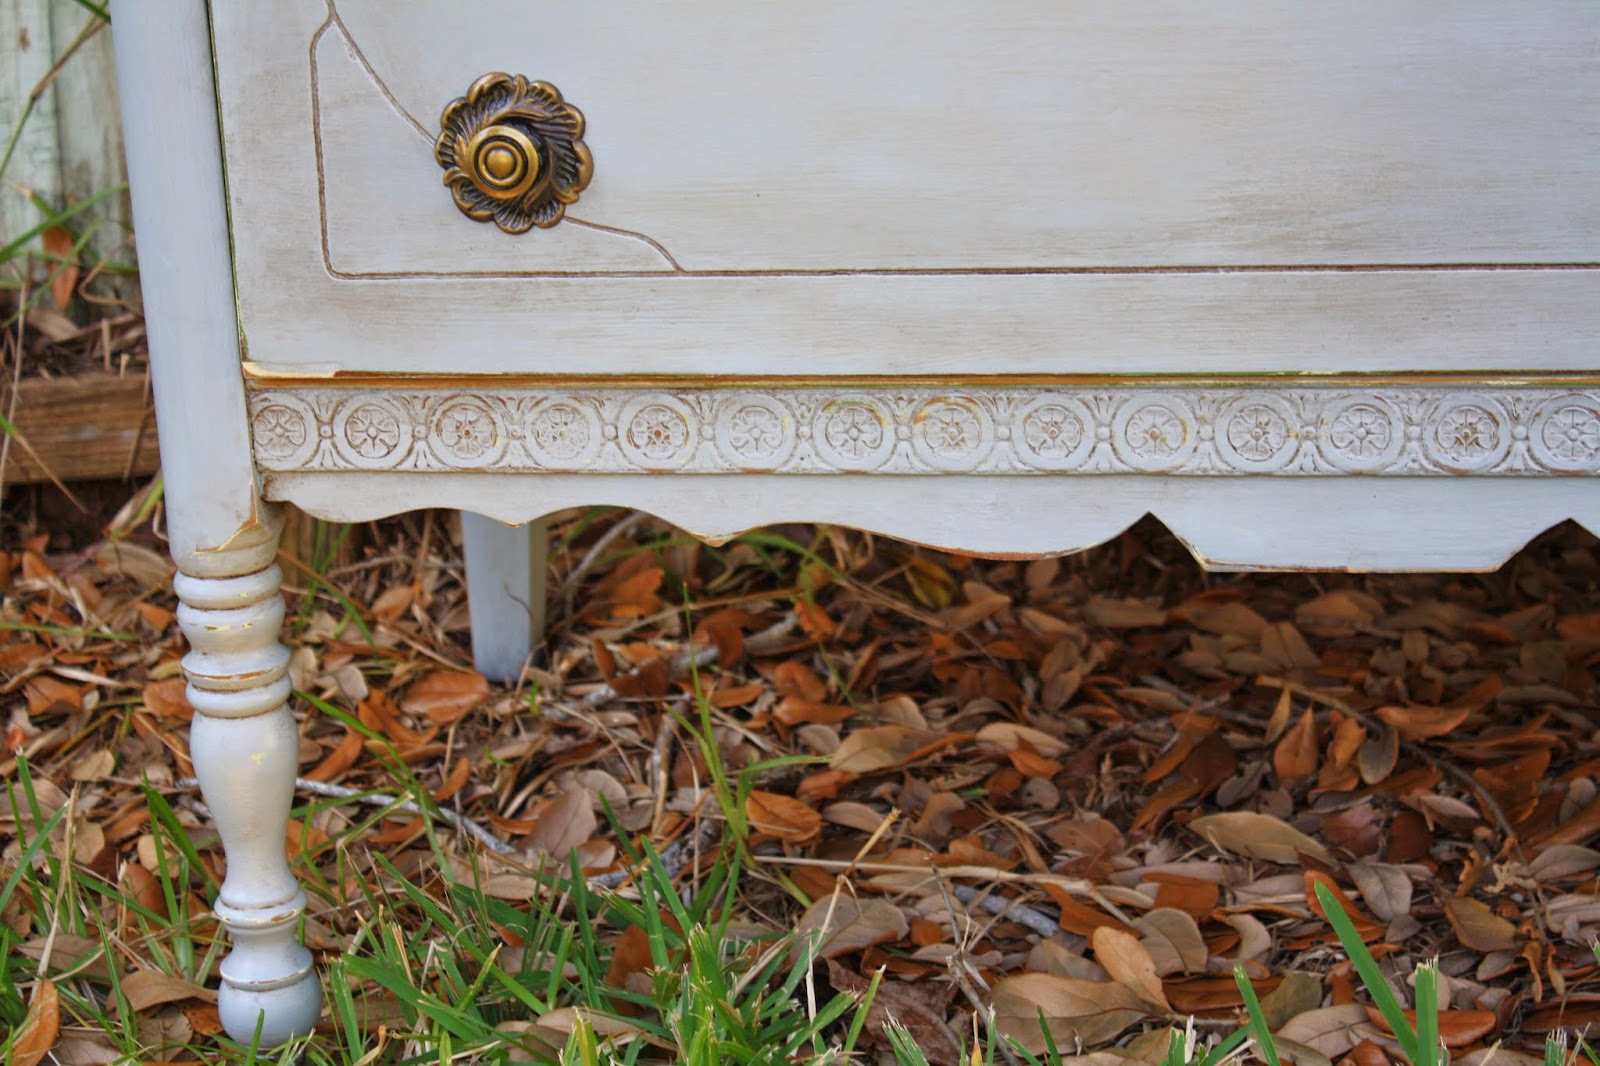
Pretty details along the bottom of the dresser. This was not seen at all with the green paint and even before the dark wax.


You can see the upper edge of the drawers were stripped . I sanded and stripped them until I got down to bare wood then wiped some stain on the edges followed by wax. The drawers open and close much easier now.


Before


After


I'm very happy with the results of this project. I knew this piece was beautiful under all of the old paint.  No more previously painted pieces. for me. At least not unless I can simply paint over the old paint!

Things I learned:
  • a previously painted piece can be a pain in the neck
  • how to tint wax with stain to make dark wax


Sunday, August 31, 2014

Estate Sale Chair Makeover

I went on a recent estate sale outing with my shopping buddy Laura. We had 2 local sales to go to and based on the ad I saw, our expectations were low. Well we hit the jackpot. I love a day like that! We both found a few items we were interested in. I found this lonely little chair sitting off by itself. I loved the swirly arms and the detail in the back, but it was a bit dreary. Unfortunately my "before" pictures are bad. The chair was a reasonable price and I couldn't resist.


I wiped it down with a rag to dust it off and painted with 2 coats of homemade chalk paint. I went a bit more bold in the color than my usual choice. I think I like it. 


I sanded between coats, then sanded and distressed after the 2nd coat was dry. I distressed the arms a bit more than I intended to, but it's done now!
After wiping down with a tack cloth I waxed with Fiddes and Sons clear wax.

The seat was sturdy but covered in an old gold fabric. I found a beautiful print and covered over the seat without removing the old fabric.
I'm happy with the new chair. The pretty detailed back and the swirly arms stand out more with the beautiful paint color and distressing. I love the finished project.


Things I learned form this project:


  • check photos before going to the next step in a project in case you need to redo photos
  • take a break during distressing /stand back to check progress/keep from distressing too far


Sunday, July 27, 2014

Craigs List Cedar Chest

  I sold my first painted cedar chest a few months ago.  I immediately missed it because I was using it for storage of CDs and DVDs in our greatroom. I didn't love it though. I did not like the shade of yellow I painted it with, so I was happy to have an excuse to search for a new/old cedar chest. I was happy to have sold the crazy yellow one on CL.
goodbye yellow cedar chest!


I didn't realize how difficult it would be to find a new/old cedar chest in my price range. Eventually good old CL came through with and ad for one for $15. Perfect! I called ahead and my husband went with me to pick it up.
welcome new cedar chest!


The picture on CL showed an opened chest which I didn't think twice about. Until I went to buy it. It had a fabric covered padded seat. Oiy. The fabric was grimey with stains. Cranberry color with small floral print. And it was corderoy. The mdf board was falling apart. 1 of the 4 pieces of hardware was broken and there was a lot of repair work to be done on the lower front. Just what you might expect for $15. Sold!!
eww


I was planning on covering a new piece of mdf for the seat but my husband suggested we buy a stainable board, cut it and route the edges and attach to the seat. I liked that plan much better. That plan called for purchase of a new board vs new mdf, new fabric and padding. After the board was cut and edges were finished, I sanded and stained the board w stain I had from a previous project.

With only 3 of 4 usable hardware handles, I filled in all of the holes and decided I would make this a 2-handle vs a 4-handle chest. I spent some time filling and sanding the front damaged bottom of the chest with wood filler. Once it was adequate, I wiped the dust off and painted w 2 coats of homemade chalk paint. I used a nice neutral color which I have learned I like much better for my house. I sanded between coats, and I distressed lightly when the painting was complete. My husband drilled holes for the 2 handles I was using. I spray painted the hardware w flat black paint.
better already

The hardware was added, the stained top was attached, and everything received a coat of Fiddes and Sons clear wax. The chest is in the greatroom where I had my old one. I like it so much better than the old yellow one. 


before
after


Things I learned from this project:
  • when shopping for furniture, don't judge a piece too quickly based on simple-to-change cosmetic issues
  • stick w neutral colors (for my house)
  • there are a billion shades of yellow, and only 1 or 2 are probably the good shades (I learned this w my previous cedar chest)
  • figuring out how to reuse already owned hardware is always better(thriftier)

Saturday, July 26, 2014

MMS Inspired Stenciled Dresser

We all know her and love her work...yes, MMS. I love her stenciled furniture pieces and  I had the perfect dresser to try stenciling on. My dresser was a boring rectangular ho-hum dresser that was not old, didn't have awesome legs or any interesting features at all.
But it was what I had. As I wrote in an earlier post, my daughter has moved closer to home :) and could really use a dresser. She and I both have kept our eyes opened to CL, but no luck. And I already owned the boring dresser and was ready to pass it on.

The inspirations are the MMS blue dresser and the very chippy yellow one, both on her blog and on pinterest. They are beautiful. I'm not 100% keen on chippiness, so my plan was to stencil and lightly distress. First, I made an awesome stencil using notebook paper, a pencil and an exacto knife. I marked the length of a dresser drawer, folded the notebook paper in half and drew my design. Leaving the paper folded, I cut the stencil through so when I opened it I had a wonderful drawer length symmetric stencil.


I decided to paint the dresser a cheery mint green with white stenciling. I already had a partial quart of green from a previous project so that was an easy decision. I mixed up my homemade chalk paint and painted the body and drawers green. The huge benefit of chalk paint is no prep work and quality paint adhesion. The dresser had been uncovered in the garage for 6 months. I wiped the dust off w a paper towel. That was the extent of my prep. Love it! I like to paint,but not so much clean and sand. After 2 coats I gave it a quickie sanding on the drawer fronts to get good stenciling. Doing 1 drawer at a time, I taped my stencil to the front and used white chalk to mark the pattern.
using white craft paint and a small paintbrush, i followed along the chalked stencil until the drawer was complete. I continued on each drawer until all were complete and I was nicely surprised to see all of the drawers looked uniform.
After drying, I put the drawers in the dresser and added a few more details with my craft paint.

I sanded, lightly distressed all surfaces, and wiped with a tack cloth before waxing with Fiddes and Sons clear wax. I added simple white knobs and was finished.


My daughter helped carry the dresser around in the front yard to help find a suitable photography location.   


I'm happy with the dresser transformation. It was a fun project. My daughter is taking it to her new apartment and I'm happy it will have a new home. 


Things I learned from this project:


  • how to make a stencil
  • how to take somewhat better photos

Sunday, June 1, 2014

2 Little Tables

Great news...my daughter moved back to Florida and is only 1 hr away now :)  It is great to have her close to home and so fun to be able to see her more easily than when she was 1200 mi away! She has moved into a nice apartment and is looking for some furniture to add here and there. Furniture that may not be her " forever furniture" , if there is such a thing, but affordable pieces to use for now. She has the basics, but definitely needs a few pieces. She and I found a cute bedside table a few weeks ago at an estate sale. We bought it for $8 and she wanted it painted and distressed in a medium gray. We went to Lowes and she picked out the color. I am happy to do the labor, but not decide on colors!

The "before" is a somewhat dreary table, not in bad shape, but dusty and neglected. It had a laminate top so I painted w zinzer primer as a 1st coat, then 2 coats of homemade chalk paint , sanding and distressing.


This one was a quick weekend project.


I like the layered paint look on the edges.

My supervisor approves.


We hit a number of thrift stores looking for end tables, but no luck. I got an idea of what she was looking for though and the following weekend I found a $15 solid wood end table at an estate sale. I liked the front detail and I loved the legs.


I sent her a few pictures, got a thumbs up, and started cleaning it up. This table was very dusty and a little grimey so I washed w TSP first, then painted w homemade chalk paint , sanded and distressed.

I sprayed the cute hardware black.


I love this little table.
I waxed both w Fiddes and Sons wax. Super smooth finish!


I have been wanting to try lining a drawer, so I used some fabric I had and put it on w modge podge. I painted a few coats and sanded it in the morning. It is super cute. I wish I had wrapped the fabric over the drawer and on the outside of the drawer as well. Maybe next time.


2 Cute little tables for my daughters new apartment, both from local estate sales. 

Things I learned from these tables:
  • Reusing existing hardware is always good. It keeps cost down.
  • I love Fiddes and Sons wax
  • I need some practice w drawer-lining/modge podge!
  • Shopping/thrifting/furniture rehab is always more fun when you are with someone special  :)