Sunday, August 31, 2014

Estate Sale Chair Makeover

I went on a recent estate sale outing with my shopping buddy Laura. We had 2 local sales to go to and based on the ad I saw, our expectations were low. Well we hit the jackpot. I love a day like that! We both found a few items we were interested in. I found this lonely little chair sitting off by itself. I loved the swirly arms and the detail in the back, but it was a bit dreary. Unfortunately my "before" pictures are bad. The chair was a reasonable price and I couldn't resist.


I wiped it down with a rag to dust it off and painted with 2 coats of homemade chalk paint. I went a bit more bold in the color than my usual choice. I think I like it. 


I sanded between coats, then sanded and distressed after the 2nd coat was dry. I distressed the arms a bit more than I intended to, but it's done now!
After wiping down with a tack cloth I waxed with Fiddes and Sons clear wax.

The seat was sturdy but covered in an old gold fabric. I found a beautiful print and covered over the seat without removing the old fabric.
I'm happy with the new chair. The pretty detailed back and the swirly arms stand out more with the beautiful paint color and distressing. I love the finished project.


Things I learned form this project:


  • check photos before going to the next step in a project in case you need to redo photos
  • take a break during distressing /stand back to check progress/keep from distressing too far


Sunday, July 27, 2014

Craigs List Cedar Chest

  I sold my first painted cedar chest a few months ago.  I immediately missed it because I was using it for storage of CDs and DVDs in our greatroom. I didn't love it though. I did not like the shade of yellow I painted it with, so I was happy to have an excuse to search for a new/old cedar chest. I was happy to have sold the crazy yellow one on CL.
goodbye yellow cedar chest!


I didn't realize how difficult it would be to find a new/old cedar chest in my price range. Eventually good old CL came through with and ad for one for $15. Perfect! I called ahead and my husband went with me to pick it up.
welcome new cedar chest!


The picture on CL showed an opened chest which I didn't think twice about. Until I went to buy it. It had a fabric covered padded seat. Oiy. The fabric was grimey with stains. Cranberry color with small floral print. And it was corderoy. The mdf board was falling apart. 1 of the 4 pieces of hardware was broken and there was a lot of repair work to be done on the lower front. Just what you might expect for $15. Sold!!
eww


I was planning on covering a new piece of mdf for the seat but my husband suggested we buy a stainable board, cut it and route the edges and attach to the seat. I liked that plan much better. That plan called for purchase of a new board vs new mdf, new fabric and padding. After the board was cut and edges were finished, I sanded and stained the board w stain I had from a previous project.

With only 3 of 4 usable hardware handles, I filled in all of the holes and decided I would make this a 2-handle vs a 4-handle chest. I spent some time filling and sanding the front damaged bottom of the chest with wood filler. Once it was adequate, I wiped the dust off and painted w 2 coats of homemade chalk paint. I used a nice neutral color which I have learned I like much better for my house. I sanded between coats, and I distressed lightly when the painting was complete. My husband drilled holes for the 2 handles I was using. I spray painted the hardware w flat black paint.
better already

The hardware was added, the stained top was attached, and everything received a coat of Fiddes and Sons clear wax. The chest is in the greatroom where I had my old one. I like it so much better than the old yellow one. 


before
after


Things I learned from this project:
  • when shopping for furniture, don't judge a piece too quickly based on simple-to-change cosmetic issues
  • stick w neutral colors (for my house)
  • there are a billion shades of yellow, and only 1 or 2 are probably the good shades (I learned this w my previous cedar chest)
  • figuring out how to reuse already owned hardware is always better(thriftier)

Saturday, July 26, 2014

MMS Inspired Stenciled Dresser

We all know her and love her work...yes, MMS. I love her stenciled furniture pieces and  I had the perfect dresser to try stenciling on. My dresser was a boring rectangular ho-hum dresser that was not old, didn't have awesome legs or any interesting features at all.
But it was what I had. As I wrote in an earlier post, my daughter has moved closer to home :) and could really use a dresser. She and I both have kept our eyes opened to CL, but no luck. And I already owned the boring dresser and was ready to pass it on.

The inspirations are the MMS blue dresser and the very chippy yellow one, both on her blog and on pinterest. They are beautiful. I'm not 100% keen on chippiness, so my plan was to stencil and lightly distress. First, I made an awesome stencil using notebook paper, a pencil and an exacto knife. I marked the length of a dresser drawer, folded the notebook paper in half and drew my design. Leaving the paper folded, I cut the stencil through so when I opened it I had a wonderful drawer length symmetric stencil.


I decided to paint the dresser a cheery mint green with white stenciling. I already had a partial quart of green from a previous project so that was an easy decision. I mixed up my homemade chalk paint and painted the body and drawers green. The huge benefit of chalk paint is no prep work and quality paint adhesion. The dresser had been uncovered in the garage for 6 months. I wiped the dust off w a paper towel. That was the extent of my prep. Love it! I like to paint,but not so much clean and sand. After 2 coats I gave it a quickie sanding on the drawer fronts to get good stenciling. Doing 1 drawer at a time, I taped my stencil to the front and used white chalk to mark the pattern.
using white craft paint and a small paintbrush, i followed along the chalked stencil until the drawer was complete. I continued on each drawer until all were complete and I was nicely surprised to see all of the drawers looked uniform.
After drying, I put the drawers in the dresser and added a few more details with my craft paint.

I sanded, lightly distressed all surfaces, and wiped with a tack cloth before waxing with Fiddes and Sons clear wax. I added simple white knobs and was finished.


My daughter helped carry the dresser around in the front yard to help find a suitable photography location.   


I'm happy with the dresser transformation. It was a fun project. My daughter is taking it to her new apartment and I'm happy it will have a new home. 


Things I learned from this project:


  • how to make a stencil
  • how to take somewhat better photos

Sunday, June 1, 2014

2 Little Tables

Great news...my daughter moved back to Florida and is only 1 hr away now :)  It is great to have her close to home and so fun to be able to see her more easily than when she was 1200 mi away! She has moved into a nice apartment and is looking for some furniture to add here and there. Furniture that may not be her " forever furniture" , if there is such a thing, but affordable pieces to use for now. She has the basics, but definitely needs a few pieces. She and I found a cute bedside table a few weeks ago at an estate sale. We bought it for $8 and she wanted it painted and distressed in a medium gray. We went to Lowes and she picked out the color. I am happy to do the labor, but not decide on colors!

The "before" is a somewhat dreary table, not in bad shape, but dusty and neglected. It had a laminate top so I painted w zinzer primer as a 1st coat, then 2 coats of homemade chalk paint , sanding and distressing.


This one was a quick weekend project.


I like the layered paint look on the edges.

My supervisor approves.


We hit a number of thrift stores looking for end tables, but no luck. I got an idea of what she was looking for though and the following weekend I found a $15 solid wood end table at an estate sale. I liked the front detail and I loved the legs.


I sent her a few pictures, got a thumbs up, and started cleaning it up. This table was very dusty and a little grimey so I washed w TSP first, then painted w homemade chalk paint , sanded and distressed.

I sprayed the cute hardware black.


I love this little table.
I waxed both w Fiddes and Sons wax. Super smooth finish!


I have been wanting to try lining a drawer, so I used some fabric I had and put it on w modge podge. I painted a few coats and sanded it in the morning. It is super cute. I wish I had wrapped the fabric over the drawer and on the outside of the drawer as well. Maybe next time.


2 Cute little tables for my daughters new apartment, both from local estate sales. 

Things I learned from these tables:
  • Reusing existing hardware is always good. It keeps cost down.
  • I love Fiddes and Sons wax
  • I need some practice w drawer-lining/modge podge!
  • Shopping/thrifting/furniture rehab is always more fun when you are with someone special  :)


Monday, March 24, 2014

Lamp Rehab

I wanted to replace a lamp on my dresser because my current one was too short. I thought I would try rehabbing one so I could make it just the way I wanted it to look. I found a tall wooden lamp for $5 at a local thrift store and I thought it would be perfect to paint with my homemade chalk paint. I did absolutely no prep work. None. I didn't even wipe it down.


Wooden lamp w rusty metal base.The finish is scratched and dinged up.


I painted w 2 coats of my chalk paint w a light sanding in between. I lightly distressed after the second coat.It looked so much better already.


After painting 2 coats.


After light distressing. On my dresser looking good.

And now for the lampshade. I wanted to cover a shade in fabric. I found a very affordable drum shade by purchasing an old lamp w the perfect size shade at another thrift store. $12 for the lamp and shade. I spent a little time on Pinterest reading how others had covered shades in fabric and headed to Joanne's.


Just the right shade waiting for a  pick-me-up.


Fabric is measured and cut , ready to glue.


My trusty project supervisor


I ironed the fabric thoroughly to get all creases and wrinkles out before I started. I rolled the fabric around the shade cutting the fabric w an extra inch on top and bottom. I ironed the fabric one last time before glueing. I tried to pull the fabric tight as I went along the top and bottom to keep from having any wrinkles or extra fabric.


I used painters tape to hold the ends together until the glue was dry.


Finished shade


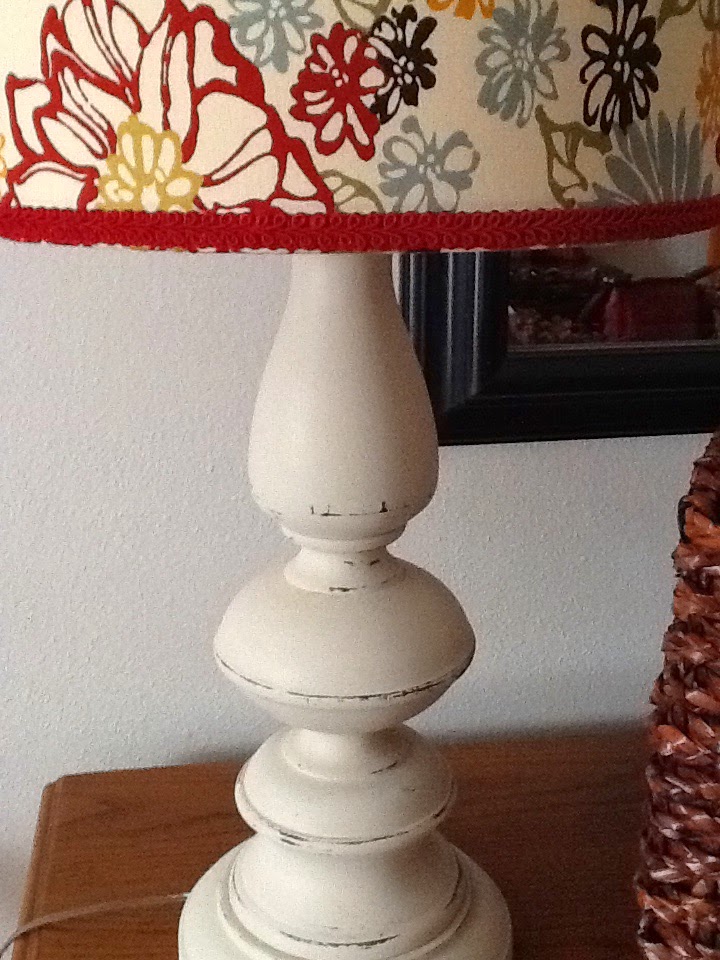
 I added a red braided trim to the top and bottom to finish it off. Fabri-Tac was the glue I used. It was easy to work with and dried quickly. I covered the shade in one evening. It was a fun quick project.

Evening picture, finished project


Daytime look


Close up of the finished project

I did not wax the base so it has a matte look. I'm happy with the finished project :)


Tuesday, February 18, 2014

Thrift Store Treasure

My children are growing up too fast.Way too fast. My daughter is a college grad and lives way too far away.  My son is in college and isn't home very often.I could write many blogs on my wonderful kids, but that is for another day.
My sweet babies 1993


  With my daughter living in another state,her tiny bedroom is in need of a makeover. I would love for her to come home for a visit and have a comfy pretty room to relax in. I just happened to have inherited a full size mattress and box spring set which would be great if I had a pretty bed for it. Enter the Thrift Store Treasure :)


The headboard was very scratched up, but petite in size which was perfect for the room.


The footboard was splintered at the bottom and was a mess. Part of the side rail supports were broken off.


After wood glue and c-clamp, wood filler and sanding
My husband gave me a lesson on using the drill press and I repaired the side rail supports. I spent a little time prepping. I washed w TSP, did a little bit of sanding, but I spent most of my prep time on the splintered footboard. Ok, ready to paint. I went with an antique white homemade chalk paint recipe and some distressing.
I love how the pretty details become more obvious after painting and distressing.


I really love the petite-ness of this bed.

The footboard is one of my favorite parts of the bed. Its small size does not eat up the limited room space, but it gives the bed a nice ending.
So happy with this bed :)

I gave the bed a good sanding between coats and used a tack cloth before the next coat of paint. I finished the bed with a coat of Fiddes and Sons light wax polish which I LOVE. It gives a beautiful sheen with no glossy shine.

This was a pretty quick project. It was super fun to transform it from dark dreary and beat up to light and fresh in a short time. One of the best parts of this treasure was the price....$15!!


The repaired splintered footboard.Looking good.


Things I learned from the Thrift Store Treasure:


  • How to use the drill press
  • How to counter-sink screws which I'm sure will come in handy in future projects
  • How much I really LOVE Fiddes and Sons wax! 
  • How I love the chalk paint "forgiveness". It seems to fill in some of the scratches I don't sand.
  • How much I love the finished super smoothness of the chalk paint after coverage and light sanding.